Monday, 4 May 2015


How can I prepare a disk for the enclosure?

If its a new disk just drop it in and you are good.

If you want to use an existing disk with data


  1. Make a copy
  2. Make a second copy
  3. Make a third copy (keep this off site - Another location


Now you have backups we can proceed. Note one copy is NOT a backup.

When you put a new drive in the enclosure,  normally there is a prompt to format the device, accepted and the drive comes on line after the format.

Which Operating system are you using? It is a bit more involved in Win7 as the large drives are quite new Win8.1 does not need any special apps. 

For used drives you need to wipe the drive partition. If the drive works when connected via SATA it has a partition table!

If you want to try some of the free tools remember these will only work if the drive is connected via SATA to your PC

http://www.partitionwizard.com/free-partition-manager.html
http://www.easeus.com/partition-manager/


When you install a drive in the external enclosure your data is written to the disk by the USB-SATA bridge controller.

When the a 3TB disk is installed the WD's 3TB My Books are configured with 4KB LBAs. When you remove the drive from its enclosure and install it inside a PC, you expose the drive's 512e LBAs. This means that sector 0 is still in the same place but every other sector is out by a factor of 8.

The original partitioning scheme on the disk when its in the enclosure is MBR, not GPT. A 4KB sector size allows for a maximum MBR partition size of 16TiB whereas the traditional 512-byte sector size would limit the partition to 2TiB. This is why the controller masks the true drive geometry.

What to do

  • Pop the drive into a PC using SATA and wipe the partition table and the drive. WD utils will help here or one of the free tools above.
  • Windows might offer to format the drive for you, decline
  • Remember at this time the drive will not be accessible from the PC except as a raw unpartitioned drive.
  • Remove the drive from the PC (Power down the PC wait for the disk to stop spinning) 
  • Pop the drive into the enclosure and connect via USB add power
  • Windows should offer to format the new device, accept and go with the defaults. Remember it can take a minute or 2 to detect the USB drive. 


Tip

Do not use a USB HUB or Front Panel USB use the USB socket on the rear of the machines (this normally comes off the motherboard for a PC.) on a laptop try and unplug other use ports (e.g Phones charging etc.)

If this does not work try another Hard disk and report if that works. Some HDs may have a geometry that cannot work with a USB controller.

FAULTY DRIVES

  • If your old drive has errors, Run CHKDSK /F /B on the drive.
  • Spinrite is a great program for bringing life back to old drives. www.grc.com
  • Use the drives low level utilities to low level format the drive.
  • Also the slow format (not quick format) in Windows will write to all parts of a drive. This can be slow but it will test the entire disk's surface.

Sunday, 26 April 2015

How to install a drive into the enclosure:

You will need


  1. 4 mounting screws 
  2. 4 rubber mount points
  3. 1 Philips screw
  4. 1 USB controller board
  5. A 3.5" SATA drive (formatted or wipe) do not do this with a drive with data on. Small drives <1.5 TB might not need to be formatted and may retain their data. Either way make sure you have 3 OTHER COPIES of you data as you WILL FORMAT THIS DRIVE!

Install the 4 sliver mounting screw on the side of the drive. Gently position them and turn them until tight. Use a Torx 10 driver to tighten if needed or a soft cloth and pliers. DO NOT OVER TIGHTEN as the case and parts are aluminium 


Now the mount points are on the drive should look like this. Slide on the 3 rubber dampers.


Once fitted the dampers will cover the sliver mount points the drive should look like this.


Slide the USB controller on as shown. We are ready to install the drive and controller into the vented part of the case.


Angle the drive into the case. Take care that the USB Port and Power Port on the USB controller line up with the holes on the vented part of the case.


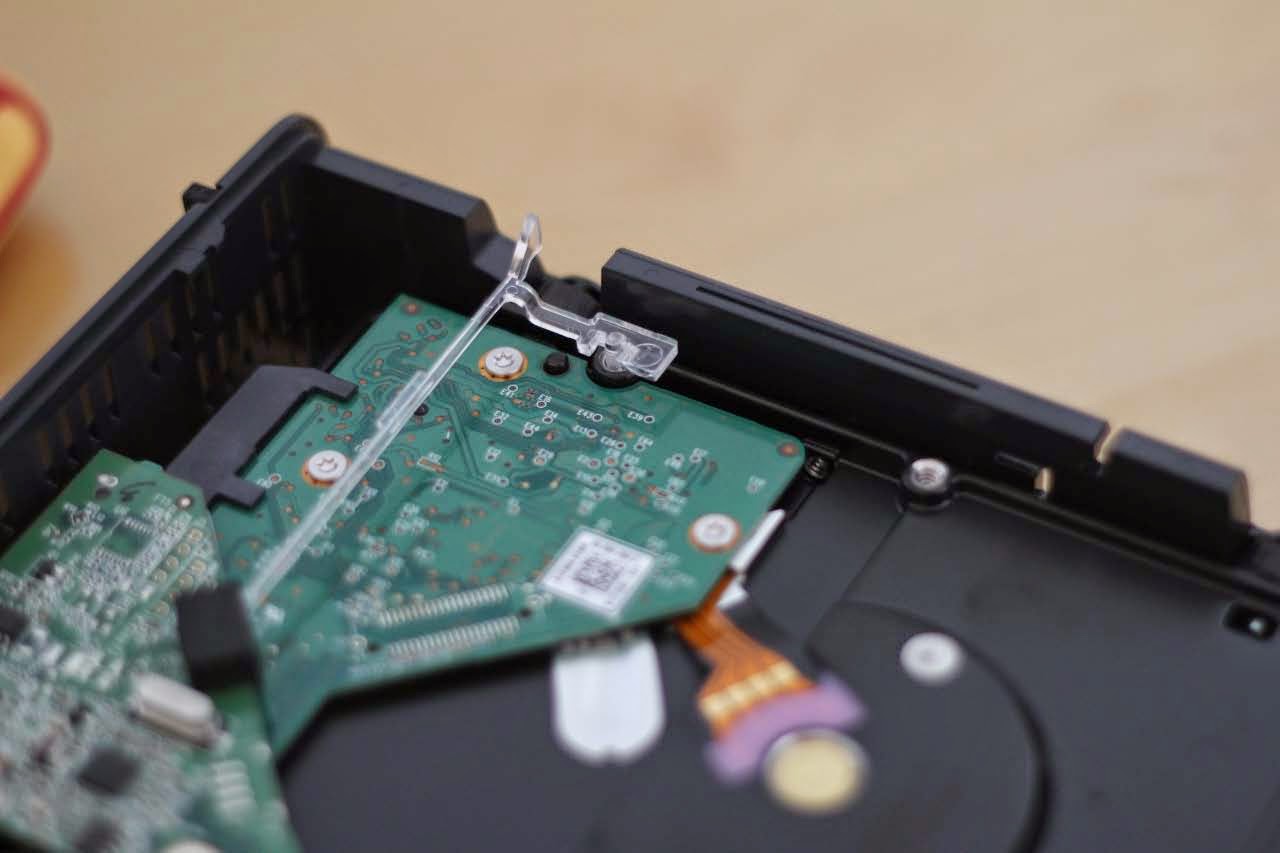
Once in the case we can installer the light pipe. 


Slide the thin end into the rubber shroud on the USBc controller and place the mounting part of the light pipe into the screen hole on the HD.


Now refit the single philips screw that holds the USB controller in place. It is a good time to check the USB connection and Power connection are aligned with the holes on the case. TAKE CARE the drive is not yet fixed inside the case and it will FALL OUT if you don't hold it with care!


OK now slide the drive into the case. Take care to make sure the vented part has its rubber feet DOWN and the Shiny part of the case has the WD Logo at the bottom.

Above: Ready to slide into the case...

Above: Drive almost complexly inserted...

Above: Almost done....

Above Done!

Above Done ready to go!


Opening the drive is quite simple. I just inserted a plastic pry tool (called a spludger) and ran it along the length of the back. It is really IMPORTANT not to try and open the case like a book. The key is to lever the plastic with the vent holes back: Away from the front of the case with the WD Logo. Take a look at the photos below as you see only 3mm or 4mm opening is enough to open the case..


Below you can see the vented part of the case is sliding off as I pry the gap GENTLY open. No need for force just be patient. Avoid metal tools plastic is fine.


Now the vented part of the case is a few mm back. The 4 retaining clips on the inside of the shiny cover are almost off. DONT TRY AN OPEN THE CASE LIKE A BOOK YOU MAY BREAK OFF THE RETAINING CLIPS. Its not the end of the world as the case will work fine without them.


Here the vented part of the case is even futher back and the clips on the shiny part of the case will disengage. You can see 2 tabs extending from the vented part of the case into the clips on the shiny part of the case.


The same shot but showing the base of the case. Again see how the vented part of the case is moving back.

 Ok the vented part of the case is free of the 4 clips on the shiny part of the case and the vented part of the case slides out. To reveal the internal HD.


The HD is a stock WD Part. Note how the controller is held in place with one small Philips screw.


This is the other side and you can see the top of the HD


Ok before removing the drive from the vented part of the case that holds it we need to remove the SINGLE screw that hold the controller in place.


Now the screw is off .


There is a thin plastic light pipe that runs from an LED on the USB Controller to the front of the case.


Here is another shot showing the full run of the light pipe, It is thin optical plastic so take care not to snap it!

There is a SINGLE point where the light pipe is seated into one of the drive mounting holes. GENTLY grip the rectangular plastic and pull up to pull the light pipe vertically out ot the drive mounting hole.

You can gently unhook the thin end of the light pipe from the rubber shroud around the LED on the USB controller and rotate the part to loosen it if needed.

Below the light pipe has been removed. Its not needed for the drive to work but it is nice to see the LED.


Now the light pipe is off and the screw holding the USB controller remove one side of the drive can be gently lifted. You can see 2 of the rubber mount points on the drive have been exposed as the drive is free of the case on the top right of the photo below.


The power and USB port will clear the vented part of the case and you will be able to lift the drive and the USB controller off. Here the drive and USB controller are shown just after removal from the vented part of the case.


Gently slide the USB controller off the SATA drive by sliding it up (away from the camera in the photo above. The USB controller has a protective plastic triangle on the base. DO NOT REMOVE IT. It is used to prevent short ciruits with the PCB on the drive!


The rubber dampening feet just slide off. This reveals 4 shiny mount points. These are normally Torx 10 or smaller. If you don't have a Torx bit use pliers and a soft cloth or carefully use a watchmaker screw driver to loosen. You can remove these by hand once loosened.


That's it the bare drive is removed! Remember the drive may not work (if its >2tb) directly in a PC unless reformatted (wipe the partition and format)


The drive enclosure has lots of cooling and it is fanless ideal for modern 5400 drives. The controller also hides the geometry of the drive so that legacy devices like the WD TV Live can access the full 3TB. This is done by partitioning the drive into 3 but the control presents ALL the storage as a SINGLE external device. This is automatic and even formating the drive is simple as the controller creates and maintains the partitions automatically. In Windows or Mac just format the drive as normal Excellent Design!


The finish on the case is Piano black. Look at this photo (not touched up or processed) the camera has focused on the chair reflected on the side of the case. This is a very high end finish and seems well made.


Cooling vents cover the top rear and base of the case. Rubber feet allow clearance for air flow and provide excellent grip


The rear is simple and elegant no power switch as the unit powers down when the PC is off or the drive ejected/


In testing this is FAST, Really fast using the original drive (which was not super-fast) I got 169MB/s using Black Magic on Mac and in Windows for that same drive, measured 162MB/s read and 143MB/s write. That’s MB not mB!! Like I said one of the fastest enclosures from a company that is the leading HD manufacturer. Even on USB2 this by far the fastest enclosure I've seen.

Simple rear sports power and super speed USB 3. Remember you can still use a standard Micro USB cable with this unit but you will not get superspeed USB3


The unit has a good design and powers the disk down when the drive is ejected so is silent and power efficient. This will also extend the life of your drives.

Rubber feet on the base are well made and the unit is fine even on glass.

Saturday, 25 April 2015


This blog is about the 3TB Model of the WD My Book USB3 External HD
  1. Having a single copy of anything is NOT a back up. I could put a label on a disk saying "Backup" but if it is the only copy and if it is lost - It is gone for good.
  2. Even if you have a reliable storage device, point 1 above applies.
  3. Even if you had a device that never failed (assume its a magic storage device with magic hardware) point 1 still applies. Think about it 
  4. Your magic storage device my be lost or stolen
  5. The device may have is data corrupted as hardware fails or software crashes on your computer (e.g. during a write operation)
  6. You read point 1 right.


I've seen a lot of information about these units. And there is a lot of information that is plain WRONG. I'll document what I find with my device.

First of all lets start with the basics not just for this drive but any drive

Take home from this? To not have faith in any one device / vendor / cloud storage. If its important think about the cost of replacing the data or the loss in emotional terms. 

Now the good news

STORAGE is INSANELY CHEAP and super reliable.

Keep one copy for working, and make 2 separate copies on 2 separate media. Store the 2 copies at 2 different location (far enough away so you will not lose both in the case of a flood / fire / quake / tornado / other bad thing)

If you want to know more...

http://www.dpbestflow.org/backup/backup-overview

These are the opening lines of the site

"There are two kinds of people in the world - those who have had a hard drive failure, and those who will. Make sure this common occurrence does not lead to the loss of your image collection."